
Classic Sourdough Bread Leavened with Rye or Wheat Starter in 7 Steps

There are numerous bread recipes available online and you may prefer one over the other. We have achieved the best results using the recipe below. Keep in mind there are multiple factors affecting the process, like temperature, environment, manual skills and techniques, and of course the activity of your starter.
Timing also can be easily adjusted to fit your daily schedule - you can achieve similar results if you have a standard 9 to 5 job, or if you work from home and can be more flexible.
Treat this recipe as a general guide only and feel free to experiment. See what works best for you.
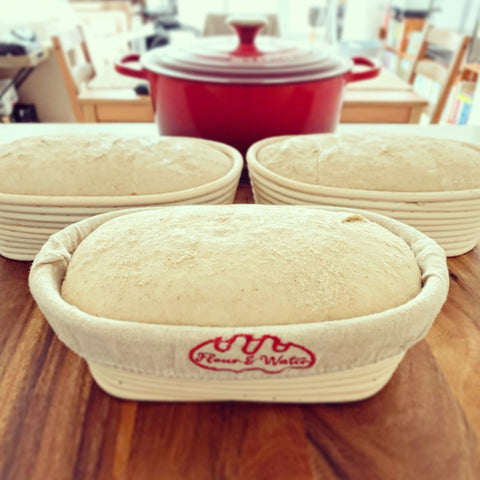
How to make a sourdough that fits exactly in Flour + Water bannetons?
We offer two types of bannetons – round and oval – and they both vary in shape and size. Therefore, the amount of ingredients that you use in a recipe will also vary. You want your shaped loaf to have sufficient space for the final rise, without escaping the basket. Use baker's percentages to adjust each recipe.
What you may need:


STEP 1: @ 10.00pm – PREPARE LEAVEN (8 - 24 hours)
(optional but recommended)
We recommend preparing a leaven to ensure your starter has maximum activity. This is a mixture of your starter (wheat or rye), baker’s flour (wheat) and lukewarm water at 1:2:2 ratio. It will end up in the final dough mix and will be baked with other ingredients.
Mix everything thoroughly in a separate container and put aside for at least 8 hours. After this time, your leaven should have risen and be visibly active - look for bubbles on the surface. Time will vary depending on the temperature - it takes longer if it's cold.
We often prepare it the night before, so that it's ready to use in the morning. Our recommended leaven mix is as follows:
- 40g starter (50%)
- 80g flour (100%)
- 80g water (100%) @ room temperature
TOTAL: 200g
In this recipe you will use 110g of the leaven if using the oval banneton, and 150g if using the round banneton. The remaining amount can be discarded or used in another recipe. If you're worried about the waste, adjust the amounts accordingly.
Preparing a leaven is optional but highly recommended - it ensures your starter is sufficiently active and therefore ready to ferment the dough! If your starter has recently been fed and you have enough of it to use for baking - just go ahead with it!
STEP 2: @ 8.00am – DOUGH MIX / AUTOLYSE (0.5 - 1 hour)
It is important to let all the flour hydrate completely before mixing with the leaven. Mix flour, water and salt in a large bowl and set aside for 0.5-1 hr. The dough should be somewhat lumpy yet well-mixed (no dry spots of flour). Give it some rest and it will become easy to handle. If it's still sticky, just wet your hands.

Why do we love our Danish dough whisk so much? It saves us so much time and mess - a few stirs and the dough is ready. No need for a kitchen robot and heaps of satisfaction by doing this manually.
How to prepare the right dough mix for your banneton?
ROUND BANNETON
• 750g flour (100%)
• 525g water (70%)*
• 19g salt (2.5%)
• 150g leaven/ripe starter (20%)
TOTAL: 1444g dough mix
OVAL BANNETON
• 550g flour (100%)
• 385g water (70%)*
• 14g salt (2.5%)
• 110g leaven/ripe starter (20%)
TOTAL: 1059g dough mix
* Depending on what flour mix you use, you may need to add slightly less or more water (+/- 5%)
Incorporate the leaven or ripe starter only after you have allowed at least 30min for the dough to complete the autolyse step. It will make mixing and kneading so much easier. Just use your wet hands and work the dough - it will not be sticky and should be easy to handle.
Note - if you mix everything at once (no autolyse) - it will also work! So don't stress.

STEP 3: @ 8.30am – STRETCH ’N’ FOLD x3
Once your leaven/ripe starter is incorporated, perform the 'stretch and fold' technique every 30min for 2 hours or until you feel the dough is elastic and does not tear when you stretch it. Check out some YouTube videos to learn this important technique.
This step is probably the most important part of the whole process as it helps to develop a strong gluten structure. It will help your sourdough to maintain its shape until baking. It needs to build some tension on the surface.
How to do it? Grab the dough with the silicone scraper, stretch it up high so that you can fold it over completely. Now grab the other end of the dough and repeat the process for all 4 sides: north, south, east and west. Keep the bowl covered with plastic wrap or tea towel in between every run to limit drying. Perform this process about 3 times, every 30 minutes or so.

STEP 4: @ 8.30am – BULK FERMENTATION (6 - 8 hours)
This step has started as you performed the first run of the 'stretch and fold'. After 3-4 runs, let the dough sit for a few hours, covered, until it's increased in volume. It will be soft, airy, and if you keep it long enough it should feel like a marshmallow.
After around 6 hours the dough should have risen by up to 50%, and you may even see some bubbles on the surface.
We usually let our dough ferment throughout the day, without looking at the clock, depending on the surrounding temperature. Note if it's cold, it can take much slower! So wait patiently for clear signs of fermentation.

STEP 5: @ 2.30pm – SHAPE / BENCH REST (0.5 hr)
The bulk fermentation is now over and your fermenting dough should be soft and airy, very stretchy and easy to handle. Dust the benchtop and your hands with some flour and dump out the dough. You may use the bowl scraper to get the dough out of the bowl.
Stretch it gently in each direction - it should now be lying flat on the work surface, in a rectangular shape.
Fold it like an envelope - left and right sides go towards the centre, then the bottom side goes over them completely. Grab the top side and fold it over the bottom side tightly. The dough should be sealed tightly and resemble a bread loaf - you may want to refer to some videos online to learn the right technique!
Sprinkle lightly with some extra flour and let it rest on the bench for 30min, uncovered. This step will solidify the shape by strengthening the gluten structure.

STEP 6: @ 3.00pm – REST & PROOF (2-4 hours or overnight)
Once shaping and resting are completed, place the dough in a generously floured banneton for proofing, UPSIDE DOWN. If you use basket liners, there is no need for any flour as the dough should not stick (we like to put some semolina or polenta).
Proofing is the final stage of fermentation to allow the shaped bread increase in volume and build a nice open crumb with large air pockets. At this stage some extra flavours develop, too.
Bench knife/dough scraper is very useful here - use it to transfer the dough (top side down). Do not score the dough just yet, this will be done directly prior to baking. Be gentle but firm while you transfer it.

Dough proofing in room temperature can take just 2-4 hours, before it is ready for baking. However, we know that the most complex flavours can only be achieved if we allow overnight proofing in cold temperature (in the fridge)!
For cold proofing, place the banneton with the proofing dough in a plastic bag and put in the fridge overnight. This will slow down the yeast, but the lactic acid bacteria (Lactobacillus) will still be active and continue fermenting the dough. This process will allow your loaf to develop more complex flavour and have an airy crumb.
Additionally, cold proofing ensures the dough is more stable once you take it out of the basket in the morning. You can proof the dough in low temperatures for up to 24-48 hours (if you keep it longer it will start to loose its strength and shape).
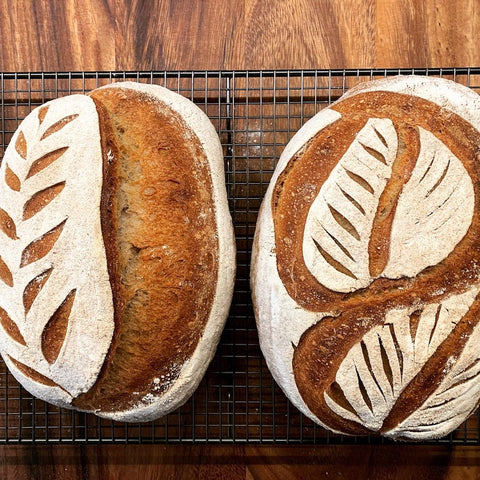
STEP 7: @ 5.00pm or next morning/afternoon – SCORE & BAKE (1 hour)
Pre-heat the oven to 250 C (or the highest temperature your oven can go to). Before you bake, you need to make a few incisions along the bread surface to allow for its controlled expansion during baking. This is called bread scoring.
If you use a Dutch oven (a heavy pot usually made of seasoned cast iron with a tight-fitting lid) place it in the oven to pre-heat for at least 30-45 minutes. You will only transfer the dough inside once it's super hot.
Take the dough out of the fridge (if cold proofing) and follow the steps below:
- Place some parchment paper on top of the banneton, and cut it to size (round or oval shape, depending on which banneton you use).
- Put a wooden board on top, and then quickly – but gently – flip over the whole thing, so that the dough now lies on the paper and on the board. If you're comfortable, you can also use your hands to get the dough out of the banneton and put on the paper - it should keep its shape.
- OPTIONAL: For decoration, dust your dough with flour (use a sieve / fine mesh strainer). We like rice flour as it doesn't go brown in hot temperature!
- You can now score the dough in a few places (don’t hesitate to cut deep). This allows it to expand during baking without tearing uncontrollably. Use our standard bread scoring lame or check some from the Wire Monkey collection.

Quickly transfer the scored dough into the pre-heated Dutch oven (gently slide it off the board directly into the pot and close the lid). Put the lid on and bake for 20-25min. Do not open the lid during this time so that the steam can circulate.
- Reduce the temperature to 220 C, remove the lid and bake for another 20-25min or until the bread has developed a nice brown colour of caramelised sugars (ever heard about the Maillard reaction?)
Rest on a wired tray for 2 hours to cool down completely before cutting into slices. This is important!


What if I don't have a Dutch oven?
No worries! Simply transfer the dough onto one of your oven racks (our oven has 4 levels, and we use the second one from the bottom) and use the same settings as described above.
Dutch oven allows the steam created by evaporating moisture from the bread to circulate in the vessel. Some steam goes a long way in sourdough baking, so you may want to put a little heat-proof tray/cup with water in the oven. This extra moisture will help to create that beautiful crust on your bread.